Daily news, dev blogs, and stories from Game Developer straight to your inbox
Sponsored By
Featured Blog | This community-written post highlights the best of what the game industry has to offer. Read more like it on the Game Developer Blogs.
Creating a Scalable Framework for Puzzle Levels
From the beginning this project wasn't just about the final product. I wanted to learn better practices for scalable and maintainable code.
5 Min Read

Islands of Insight (left), Understanding (right)
I love puzzles, so when I decided to start a game development project on my own this year, I wanted it to be a puzzle game. As I am working on this on my own and at the same time as working on other projects for classes, I decided to go with a simple blocky puzzle style inspired by the game Understand and some puzzles from Islands of Insight.
From the beginning this project wasn’t just about the final product. I wanted to learn better practices for scalable and maintainable code. I started as many Unity projects do, by placing objects (in my case tiles in a grid) into the scene, giving them placeholder images, and attaching scripts to make them respond to inputs. But as I expanded the scope of the project I added some useful “containers” for information that I would be regularly using. To start I turned those starting tiles into a handy object Unity calls a prefab, so that I could make changes to them all at once. Next I wrote a “Level” script that would take as inputs a number of rows and columns and generate a correctly sized and proportioned grid, allowing me to create new levels within seconds and without having to make dozens and dozens of repeated objects or scenes.
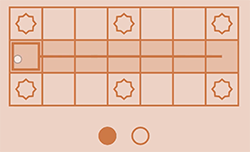
But of course I wanted a level to have more information than just how many rows and columns it would contain. I wanted levels to have added challenges like fixed tiles that couldn’t be changed by the player, numbered tiles like in Islands of Insight, and possibly even gaps where tiles in the grid were entirely removed. To accomplish this I created another kind of Unity container, this time a scriptable object that I called “Level Data.” Below I have an example of one of these Level Datas and its corresponding grid, where tiles with a red square in them are fixed tiles.

Of course levels in a puzzle game aren’t any good unless they have corresponding rules that you have to follow in order to solve the puzzle. In Islands of Insight these rules are relatively straightforward and given to you on the right of your screen with helpful images. In Understand however, these rules are intentionally hidden from you. The only information Understand gives you is how many rules you have to follow, and the only feedback it gives you is which rules you are currently breaking. This means that part of the puzzle is just figuring out what the rules are!
Understand’s rules are just circles that are filled when completed
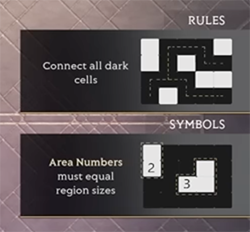
Islands of Insight tells you its rules
I chose to go with Understand’s hidden rules mechanic because it is very interesting to me, but I also took several rule Ideas from Islands of Insight to use with my numbered tiles, which were also taken from that game. Once again though, I was trying to push myself to make a scalable game, so part of my rules undertaking was to make rules that I could quickly and easily add or swap out in my levels to test different challenges and easily make new levels with. This was definitely the most time consuming part of my project, but what I eventually settled on was one big script that
contained functions representing each rule.
For this to work, each function would need to take the same inputs and return the same outputs, so that my game wouldn’t need to care what rule it happened to be. The output was easy, each rule would return true or false, true if the rule was satisfied, false otherwise. For the input though, each rule would need different information from the level. My “No Three in a Row Black” rule needs different information than my “Numbers Area Size” rule which says that each numbered tile must be connected to a number of same colored tiles exactly equal to its number. So I created another container which would act as the input for all of my rule functions, this one I called “Grid Data” which would contain all the relevant information from the level
such as the state of each tile (true = black, false = white, null = empty) and the positions of each numbered tile on the board.

All that was left at this point was to figure out how I would assign these rules to my levels and how I would pass the relevant function to my Level Manager script. There wasn’t a clean way to choose functions from the Unity’s Inspector, so after putting in so much effort to make my code clean and simple, I finally broke and created an enum which would contain the names of every function and which I would have to manually update whenever I changed the name of a function or added a new one. With this small breach of my core promise for this project, all I had to do was use Unity’s very useful “CreateDelegate” function to call my rule functions by the name I chose from the enum.

Finally I had a complete framework from which I could make as many levels as I wanted. The beauty of the way that I created my project was that I could now create new Tile prefabs with different shapes or colors, add them to a level, and play it all within a minute. I could make new rules and then immediately add them to a level to test. I’ve included a gif below to show just how easy it would be if I wanted to change a rule or change the tiles in a level.

If you want to see more games from me or want to play the game when I release a demo, you can follow me at https://hamiltongilbert.itch.io/
Read more about:
Featured BlogsAbout the Author(s)
You May Also Like


