Daily news, dev blogs, and stories from Game Developer straight to your inbox
Sponsored By
Featured Blog | This community-written post highlights the best of what the game industry has to offer. Read more like it on the Game Developer Blogs.
From DK1 to DK2: What to expect
With the brand new Oculus Rift DK2 now getting in the hands of developers, it's useful to know what are the main changes you can expect to see coming from the old devkit.
10 Min Read

With the brand new Oculus Rift DK2 now getting in the hands of developers, it's useful to know what are the main changes you can expect to see coming from the old devkit. This post is a mix of my first impressions with the kit, and some tips and tricks that might help you hit the ground running when you get your own. Let's get started!
The Setup
If you have experience with the Oculus Rift DK1, you are probably familiar with the issues of setting up what Windows considered, in essence, to be just another monitor. The recommended setup was to make the Rift a desktop extension, since this decreased latency and reduced problems with v-sync, but it always was a bit cumbersome, since the display would be treated as part of the desktop, meaning you might end up opening (and losing) windows on there.
With the latest SDK these problems are finally gone. The new Oculus Driver includes a “Direct Mode” that removes the need to set it up as a monitor. Games that use the Rift will be able to render into it via the SDK, but it won't show up as a Windows display anymore. This has the same benefits of setting it up as an extended display, but removes all of the inconveniences, and it's much closer to what we would expect in a commercial product.
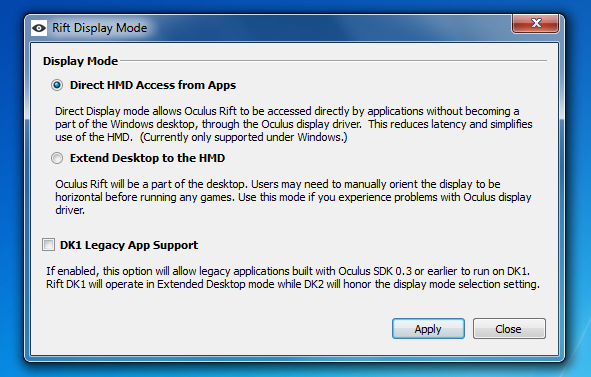
Additionally, applications using this new SDK can choose to clone their output into a window that will spawn on the main display. This way we can see on the screen the same view the HMD wearer is seeing inside the device. It comes with a small penalty in performance, but it's a very useful feature to have when demoing the Rift, or just for debugging purposes.
Another novelty of setting up a DK2 is its infrared camera, which is used for positional tracking. You will have to place the camera in a position where it has a clear view of you, and at a sufficient distance to ensure a wide enough field of view, since if it's too close it will lose sight of you easily and you won't have much freedom of movement. It's also important that it's secure enough so it won't move during play!
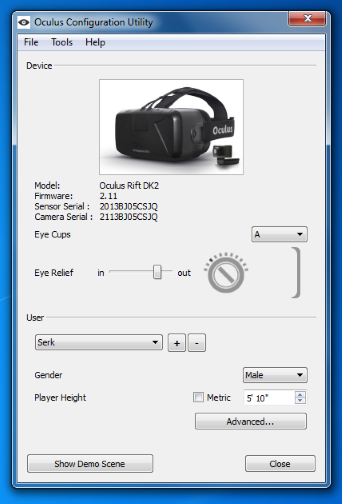
To help you with this, you can use the Oculus Configuration Utility. After inputting all the values to customize the device behavior to your own personal preferences, click on the “Show Demo Scene” button, and you will be inside a simple environment where you can visualize the pyramidal area covered by the camera sensor. Use this to position the camera (and yourself) so that your head is roughly at the center of this area. You should also take care there aren't any physical objects in the real world that lie within this area, since you might accidentally hit them when moving around in a VR experience.
The Screen
Coming from DK1, when you use a DK2 for the first time, the main difference you will notice is the new display. The increased resolution (1920x1080p, with 960x1080 per eye), low persistence, improved contrast and colors all make for a much smoother, nitid and solid experience. The infamous “screen door effect” is also greatly reduced, though still present.
Resolution in particular allows for more freedom in design. You no longer have to make your UI elements so large, and you can have objects far away that the player will still be able to recognize. The counterpart, however, is that your game will now be required to consistently render at 1920x1080, with a 75Hz refresh rate, something that can be too stressful on lower end rigs. Fortunately, the Oculus SDK can help us in that front, more on that below.
Low persistence means the LEDs in the display will only light up for a short part of the frame, reducing judder (the blurriness you can see in DK1 when turning your head). This helps in grounding the scene and making the virtual world feel more solid, as well as reducing motion sickness.
Colors are also more vibrant on the DK2, with better contrast and deeper blacks. But this also means your game can look different than it did with DK1, so you might need to recalibrate to this new screen. Another issue you might need to face is "true black smearing", which shows as a ghosting effect in areas of hight contrast, where dimly lit pixels need to suddenly become very bright right after a head movement. Oculus is currently working to reduce this effect, but it might be wise to plan ahead and reduce these high contrasting areas if possible.
Positional Tracking
Positional tracking allows for player's translations to also be measured and integrated into the virtual world. Though this is possibly the star feature of DK2, it's actually a bit hard to notice, since it mostly works at a subconscious level. You might even doubt it's there! But if it suddenly turns off (say, because you move out of the camera's range), you will definitely feel the change.
The role of this feature is to make the virtual worlds feel more real, and reduce motion sickness caused by the disconnect between your movements and what you are seeing. When the world responds to your movements the proper way, you don't feel anything out of the ordinary, it just feels normal and your brain can safely ignore it and focus on more important stuff, which is why it's hard to know for sure if it's working. It's only when you actually feel this disconnect that your brain will make you aware of it.
That said, here are some tips you can use to make the most out of it:
Positional tracking works best at short distances. When you are examining a close object and you can move your head to look at it from another angle, or move forwards to physically get closer to it. Games that feature objects in the environment that you can inspect, or games set in cockpits where the UI is actually around you, can greatly benefit from this.
You can also use positional tracking to create a parallax effect that increases the 3d perception of your scenes, by placing objects at different depths in it. Say, looking at a distant mountain through the frame of a window, like you do in the Tuscany Demo.
And of course, you can always use it to build new gameplay mechanics around it, from avoiding obstacles, to peeking around corners in a stealth game.
However, there are also some caveats regarding the use of positional tracking that you should be aware of. The first of them being that the fact the player can now move means your game will have to always react to these movements appropriately, even in the cases when they interfere with other design elements (nothing prevents the player from sticking his head through a closed door, for instance). I talked more about these design challenges in my previous article.
Some other issues relate to the way in how the technology operates. For example: it's important to provide some convenient way for the player to reset the tracker. If a player seating in an office chair moves slightly away from his original position, that offset will be carried into the game as the camera being slightly displaced from the in-game body, which can make the whole experience less enjoyable.
We must also we aware of the player's real body, and the movements the game requires them to make, if any. A player sitting in a chair will have a hard time moving backwards, or downwards, due to the chair itself blocking the movement. If the game demands sudden and fast movements in those directions, it can become very frustrating, very fast. Favoring movements to the sides and forwards, which are easier, might be a better option.

However, just because we can ask the player to move around and dodge virtual objects, it doesn't mean we have to. Just by supporting positional tracking itself, our virtual experience will benefit from the added sense of presence. There's no need to turn it into an active gameplay mechanic, which can be detrimental if not done properly, and can also limit the audience, specially in the case of players with disabilities.
Latency Tester
DK2 comes with an integrated latency tester tool that developers can use to measure motion-to-photon time. Latency is different from FPS, and critical in VR applications. Even if your game is running at a solid 75Hz, if there is a high latency and the player's movements take longer than they should to be represented in screen, the player is more likely to feel motion sickness.
Sometimes optimizing latency is just a matter of changing the order your code executes in. Accessing the input from the device later in the frame reduces the time between the read and the actual rendering of the frame. You can learn more on how to optimize your game in the Oculus Best Practices Guide.
SDK
If you haven't worked with the Oculus' SDK since the Rift DK1 came out, you will be surprised at the changes in the newer versions. One of the most significant is that the deformation to compensate for the curvature of the lenses is no longer done in a pixel shader pass, but using a precomputed deformation mesh.
This means now you will have to render your undistorted scene into two render targets (one per eye), which will be then rendered again using this deformation mesh. This is faster, but it also opens new possibilities for optimization: if your game is not reaching the target FPS, you can just decrease the size of these buffers, in effect reducing the amount of pixels it will have to render.
Of course, this will also reduce the quality of the resulting image, since you'll now have a lower pixel density, but most of the time losing some detail is preferably to having a high latency, nausea-inducing experience. This is also a good way to compensate for the lower performance in debug builds.
Another novelty in the SDK is Timewarp. This technique works by taking the latest frame you pushed into the graphics card and distorting it by the latest motion received from the device. This reduces latency, improving the whole experience, and can even compensate for dropped frames. It's an amazing technology, but it's important to remember it can only get you so far. Timewarp won't save your game's animations and movements from looking jerky if your FPS is not consistent, for instance.
If you are using Unity, you are going to see changes related to the new Direct Mode. With the new SDK, building your game will result in two .exe files: the usual one, and an additional “DirectToRift” one that you should run when targeting the Rift. This will also remove the start-up resolution config dialog, since the game will launch at the same resolution of the device (and you shouldn't alter this resolution even if your game is running slow; rather, reduce the size of the render targets like discussed above).
Read more about:
Featured BlogsAbout the Author(s)
You May Also Like